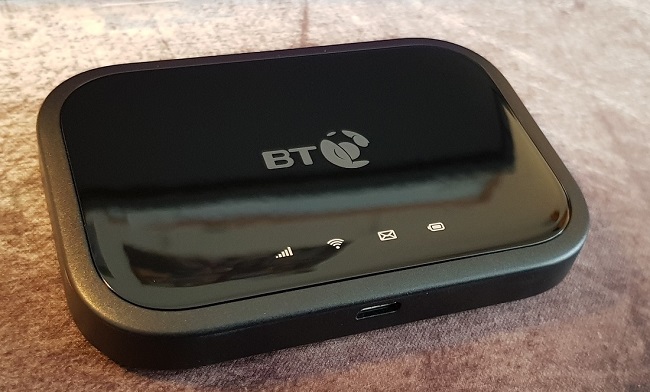
BT FTTP Upgrade from 350/50 to 910/110!

Posted by under Servers, Technology, on 29 March 2020 @ 8:27pm.

It’s been a while since I posted, and ironically my last post was about getting fiber to the premises installed. Well, I recently found out on my travels that I was able to upgrade from what was once the highest tier package.

I was originally on the 300/50 package, and I consistently got those speeds no problem. When I spotted that some areas could get an upgrade to a 910/110 package I was curious to see if I could and what it would cost. To my surprise, when I logged onto my BT account I saw that it was available for me too, and at the same price I was paying right now. So the first thing that went through my mind was why would I not upgrade? Pay the same and get more is never a bad thing, right?

I gave BT a call and spoke to one of their reps. He went through his usual script, and asked what I was using it for. I just said I was streaming a lot and downloading games, etc. to which he said maybe the upgrade would be a good thing. He had a look at what deals were available as he can sometimes get better deals than are shown online. Low and behold he got me a slightly better deal. Rather than £59.99 a month I’ll now be paying £57.99 a month for the 910/110 package. I wasn’t going to argue with that! Now I’m paying less and getting more!

It didn’t take long for him to sort it all out, but he said my activation date would be in 3 days. I was curious as to why a simple upgrade to a fiber line wouldn’t just be a configuration change done automatically, but I didn’t question it. 3 days later it went live and I didn’t even notice until I ran a speed test some time that day… OK, you got me, I was speed testing frequently and it just so happened to go live in between 2 of them!

My first speed test was rather unspectacular (relatively speaking), with a speed of around 450Mbps down and 110Mbps up. I knew that speed tests started to get unreliable at those speeds, but I tried a couple more anyway for fun. I tried going to https://fast.com as they’re hosted a bit more locally. Boom! Pretty much full speed down and definitely full speed up!

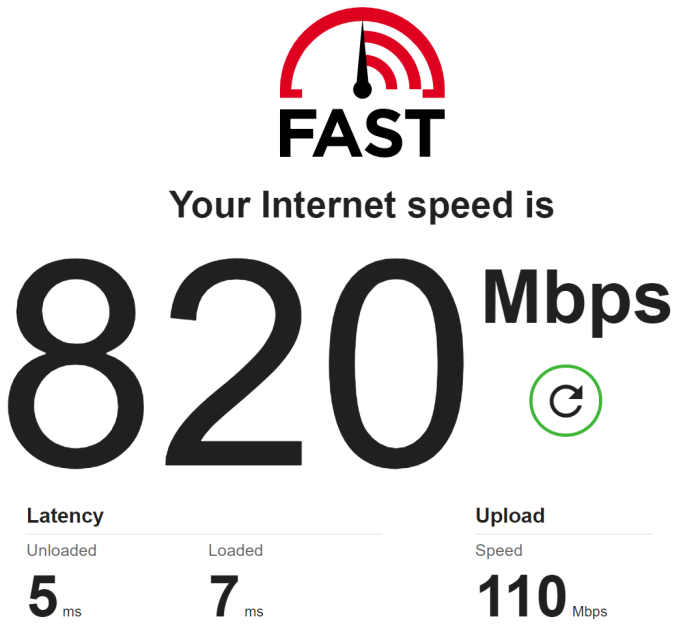
Now once again of course this is a speed test so it doesn’t quite show the maximum, but even so it shows that the connection can still achieve far more than I was on previously. Now anyone that knows me should know that wasn’t enough, so I went out thinking of another way to test it. What better way than Steam when downloading a huge game. They have massive amounts bandwidth available and they’re well known for providing extremely good speeds (most of the time).

I found a large game that I had on my list and deleted it. In this case it was Destiny 2, an 86.8GB game. This was the result:

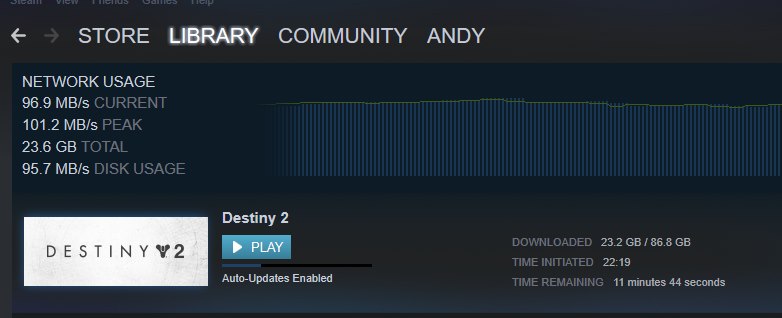
101.2MB/s peak! But that’s only(!) 810Mbps. Not quite as high as the speed test above though which was a shame, but still a great result because it was a real life transfer and not just a speed test.

I’m not sure if there is a bottleneck in my setup or overheads are quite large, or maybe I just can’t quite get those speeds from single sources. Either way its proven itself to be extremely quick, and to be honest it’s rare that I’ll even use it anyway! I’ll need to run some tests on my pfSense router configuration to see if it’s a CPU bottleneck or not, but it’s not a big deal.

I can’t imagine that BT will make any faster services any time soon because that would require getting new Ethernet cards and other networking equipment for consumers, but I don’t think it’ll matter for some time. Almost gigabit Internet is going to be more than fast enough for even the most taxing households where there are half a dozen kids and several adults all wanting to do streaming, gaming or downloads. One of the LAN party events that I regularly attend has a 1Gbps symmetric line and it copes just fine with nearly 800 people using it, so if you are using more than this line can give then you probably (definitely!) need to get out more…!


BT FTTP – Installation, failure and using the BT 4G Mini Hub

Posted by under Servers, Technology, on 3 September 2019 @ 10:48pm.

It’s been a long time coming, but BT finally got off their backsides and decided that full fibre broadband in the UK was finally needed. Luckily for me I live in one of the first areas of the UK to receive it (Wirral). Once I saw the fibre cables being installed I began to keep check on the BT broadband checker and Thinkbroadband’s maps to see when it would finally become available. I saw lots of installations popping up on the map as speedtests began to be performed and realised it must be quite close. I checked for weeks on end, and nothing changed. Every road around me was seeing speedtests, but mine and the couple directly connected to mine weren’t getting any.

I contacted BT to see what the delay was. They said contact Openreach so I did, and they said that it could be any time now. Great! I kept checking, and another 2 weeks went by and then one day it finally popped up as available. Hurrah! I quickly ordered it and got an installation date for 3 weeks later.

The day came and the install went pretty smoothly. The engineer was here for about 90 minutes running the cable from the pole to my property and then drilling a hole for it to enter into the living room. He installed the FTTP modem (also known as the ONT) and I had already received the BT Smart Hub 2 in the post. 10 minutes later it was installed and a speedtest showed that I got around 284Mbps downstream and 51Mbps upstream for the 300/50 connection that I was paying for. Not too bad! Upon looking in the BT Smart Hub settings I could see that the sync speed was 1000Mbps/1000Mbps, but it must be being limited in speed back at the cabinet to the speed I’m paying for.

BT FTTP Speedtest

So it’s all installed and the engineer goes off to his next job. I quickly decided to route it through my PFSense box the same way I had my FTTC connection routed. It didn’t take me long to set up as the method was identical. I simply turn on DMZ mode in the router, give it a known static IP on the 192.168.0.x range, connect it to PFSense, I then set up all my port forwarding as needed within PFSense and let it handle the local network DHCP on the 192.168.1.x range. Everything worked smoothly.

Fibre Failure

I say it worked smoothly, up until yesterday that is. I was browsing and suddenly there was no internet connection. The smart hub was flashing and the modem PON light was flashing, indicating that it had lost connection. I waited a while (10 minutes or so) to see if it came back and it didn’t, so I got on the phone to support. Top tip, dialing 150 from your landline if its also on BT gets you through much quicker than phoning the 0800 number, especially if you have BT Plus which appears to get priority support.

They ran some tests, got me to power cycle the modem and route, and eventually determined that there was a fault somewhere. They said that because I had BT Plus they would send out a “Mini Hub” which is basically a 4G dongle that you can connect your wifi capable devices to. I’d be without internet until it arrived, but after that it would have unlimited usage until my connection was fixed. I was told I’d missed the next day delivery cut-off but a few hours later I got an e-mail saying I’d get it the next day, so I definitely got lucky there!

BT Mini Hub Box

BT Mini Hub

In the mean time I could use BT’s hotspots, and luckily one of my neighbours also has BT so I could piggyback off that for a while using my logins. Shortly after doing that I had a light bulb moment. I remember years ago when I had BT and I also had access to the hotspots I connected my laptop to one and bridged the connection to the ethernet port, which I then fed into my regular router’s WAN port. It got my entire network back online for the day or two my regular connection was down. But try as I might this time I just could not get my laptop to connect to the hotspot. I didn’t keep trying for too long as I had better things to do, but it would have been great if I could do that.

In the mean time I connected my phone to my computer via USB and connected to the internet that way. It shows up as a virtual Ethernet adapter when connected via USB so it gives internet directly to the computer.

2 hours later my fibre connection mysteriously came back so the fault, whatever it was, must have cleared.

BT Mini Hub

So the hub arrived today and I set about having a play with it. Despite my connection now working again, the BT Mini Hub was still activated. Apparently they turn it off once the fault is fixed and can turn it on again within minutes if a fault occurs again.

I connected my phone to it and did a speedtest. This gave speeds of about 8Mbps down and 7Mbps up, which is plenty to at least get me back online. It runs on the EE network (owned by BT) but clearly it is restricted in speed because it’s got unlimited data, and they obviously don’t want you slurping up all the bandwidth. I’m fine with that as it’s not a ridiculously slow speed, but it’s not even close to what I would normally get either. The important thing is that I can get back online.

Whilst using it I was thinking to myself why they didn’t make it possible to connect your desktop computer to it as well, or have the smart hub connect to the mini hub and distribute the connection that way. I would assume it’s because nearly everyone will have at least one device which can connect via wifi and that a day or two without your desktop computer probably isn’t going to be a major issue.

I thought about doing the wifi bridging option with my laptop like I tried earlier but then I tried plugging it into my computer. Low and behold it shows up as a virtual Ethernet Adapter just like my phone did. I disconnected my Ethernet cable to ensure I wasn’t using my normal connection, and it worked perfectly. Internet was going from the BT Mini Hub directly to my desktop PC using a virtual Ethernet adapter.

That got me thinking that perhaps I could connect it to my PFSense box directly and have it set up as a fail-over connection, so if a fault ever occurs again the hub will just take over as soon as its activated. I might experiment with this before it gets turned off otherwise I would have to put another SIM card in or simulate the same setup using my mobile phone instead. I could also do similar with a wireless USB adapter connected to a BT’s hotspot, so that way assuming it’s just my connection that fails the hotspot should take over. I’d just need to find a way to keep it permanently logged in.

These are all good ideas that I’ll have to try out. I suppose the best way is just to have a mobile data contract and dongle permanently connected. Since unlimited packages are starting to become available now if it ever got to the point where I needed to guarantee my connection was alive I could get one of those connected straight into PFSense.

By the way, you can also connect the BT FTTP modem directly into PFSense if you set up a PPPoE connection too. It’s a bit fiddly but works fine when its set up properly. If you want to set it up the username is bthomehub@btbroadband.com and the password is usually empty or just “BT”.

Hopefully what I have found out helps or inspires you to try something similar 😉


Using my HP DL380 G6 and HP N54L together

Posted by under Servers, on 23 October 2017 @ 10:58pm.

Having now had time to set up and play with my new server, I have now given it proper tasks of running virtual machines rather than just sitting idle.

One of those tasks include running PFSense, a router operating system designed to handle the same tasks as your regular router but on a larger scale. It handles DHCP, routing, port forwarding, etc. This will give me more control over my internal network including the ability to monitor it better. My original router is still in the loop since it is also the VDSL modem, but it is fully DMZ to the PFSense so it acts like it’s not even there. PFSense does still get a local IP on the WAN port though.

Now that I am using the DL380 properly, this means I could retire the N45L from its original job as being the sole server. Since the DL380 only has 2.5″ drive bays this meant that I was unable to use my existing 3.5″ drives unless I found another solution. I was able to re-use the N54L as a NAS by using the FreeNAS OS. This turns the system into a fully fledged NAS to work in any way that I liked.

I had been dabbling with the use of iSCSI attached drives, but found Windows’ implementation poor as it required the use of a virtual hard drive container file to store everything. I didn’t like this because corruption of that file means anything contained within it is lost. For a virtual OS this is not so bad but for my regular data this was not an option. Thankfully, FreeNAS’s implementation allows you to just use a physical disk over iSCSI so that’s what I have done. This is then attached directly to the appropriate VM on the DL380.

The original N54L roles have now been switched to a VM on the DL380. This gives it more power to handle things like the CCTV, my web development setup, my Plex server that I am now able to run thanks to the additional power, and more should I ever need it.

At present the system has only 24GB of RAM with the main server VM using 8GB of that (up to 12GB dynamic). PFSense is allocated 2GB. That gives me plenty to start up more machines if I need it. A friend also passed to me another 48GB of RAM to add when I get the chance bringing the total to 72GB. That will be more than enough for me for the foreseeable future.

Eventually I will run other things on the server including a Steam cache (which I successfully trialled at the weekend and it works great). I just need some additional storage caddies so I can put in some more local drives. Without local drives I will be limited by the network connection to the NAS (1Gbps at present). Future plans include trying to team two NIC’s together for a 2Gbps NAS connection.

All in all it’s been a fun experience so far. One thing I did notice though is that my electricity bill has now doubled thanks to the server using a fair bit of power, but that aside it’s working just as I intended.

This is my setup at the moment. One of the N54L’s is a NAS and the DL380 on the bottom. At the top you can see my HP 1800-8G switch and BT Homehub 5 router/modem. In future I plan to get a rack to put these in but I just don’t have the space at the moment.


Server Virtualisation – A New Journey

Posted by under Servers, on 5 September 2017 @ 7:45pm.

Recently I managed to acquire myself an old HP DL380 G6 rack server. It’s the kind that you would find in a data center or business server rack. For just £125 it has 2x Intel Xeon processors and 24GB DDR3 ECC memory, a fully fledged RAID controller and redundant power supplies. It’s the kind of upgrade I needed for my ageing HP N54L micro servers.

Because of the amount of power that it holds processing wise, I decided it would be time to try out virtualisation. I decided to go with Microsoft Hyper-V because I’m familiar with Windows operating systems. I haven’t really had time to play with this server too much but I did get PFSense set up as my router as a virtualised operating system, and it’s working very well.

I gained a little experience from doing this and even more recently I decided to upgrade my web server (the one running this website) to a new one, allowing virtualisation. It has an Intel Core i7-7700, 32GB RAM and 2x500GB SSD’s. I currently run BetaArchive, this website and several others for friends from the server.

To separate BetaArchive from the rest I decided to virtualise the whole machine and install two operating systems and gave them both their own IP addresses. I had never done this before so I had to learn how to assign IP’s to each virtual machine as well as understand how the virtual hard disks worked (fixed sizes, dynamic sizes, etc). It’s all very complicated, and that’s the basic parts of it.

One thing that I did find when doing this on both my home server and web server is that SSD drives are an absolute must. Without them your system will run extremely slow because they just aren’t quick enough with standard mechanical drives. That quickly led me on to an issue that made me spend all day thinking there was a hardware issue with the new web server. I discovered that when I ran drive benchmarks that the SSD’s were not performing the way I expected. The reading was mostly OK but the writing was slow. I couldn’t understand it. I thought there was a disk issue so I asked for a replacement since the 2nd disk seemed to be OK.

The disk was replaced and I saw no change. I then theorised it might be a SATA cable issue so I asked for that to be changed. Again no difference. I then asked for the whole server to be swapped out except for the disks, and again, no difference! What?! That made no sense, so it had to be a software issue. For another 2 hours I was stumped, and then it clicked.

Kicking myself, I checked the drive cache settings. Write caching was disabled. Doh! Turning it on instantly gave the speed boost I was expecting. Why it was off by default I don’t know. Is it always off by default? I’ve honestly never noticed this on other systems that I have installed SSD’s into. I feel sorry for the tech that had to do all of those swaps for me!

Disk I/O problems isn’t something just caused by virtualising, but it is very noticeable when you try to run multiple machines at once and they fight for disk I/O. If one machine uses up all of the I/O, the other systems can lock up – not ideal! Thankfully you can restrict the maximum amount of I/O that each machine is allowed to use, as well as give each machine a minimum I/O that it is allowed to be restricted to if another machine is using a lot of I/O too. This stops one from using it all and starving the other.

So now that this is set up, everything is running just great. There are other considerations to make such as RAM and CPU allocation, but you can set up minimums and maximums for those as well.

Hopefully this is something that I can get into more and work with at home when I find the time to do it. The biggest issue I have at home is that my disks are 3.5″ disks but the new server only takes 2.5″, so I will need to use the old one as a storage array. I’ll get around to it. Eventually…


Solution to slow FTP Server speeds (Filezilla and others)

Posted by under Servers, on 23 March 2016 @ 10:50pm.

I recently found that despite having a 70Mbps (8.75MB/s) internet connection and a 1Gbps (125MB/s) dedicated server to download from, I could only seem to download from the FTP server at about 16.8Mbps (2.1MB/s) on a single thread. However over HTTP I could easily manage about 65.6Mbps (8.2MB/s) on a single thread. This confused me, as there should be no reason why the speeds should differ so wildly. I’d expect a little difference, but not that much.

After some forum discussions on Beta Archive regarding this (I looked into things after a user complained about slow speeds), a user told me that he uses IIS FTP Server with no such speed issues. This instantly told me that something wasn’t implemented or optimised properly on Filezilla and Gene6 FTP Server (the two servers I use). I started looking at the possibilities and quickly found the solution.

Solution!

The “internal transfer buffer size” and the “socket buffer size” values were set quite small on the server at just 32KB and 64KB. There is a notice that says too low or too high can affect transfer speeds. So I did what anyone would do… I bumped it up about 10 notches to 512KB on both of them! Instantly my transfer speeds hit 65.6Mbps (8.2MB/s), the same as I was getting over HTTP. Perfect!

filezilla_ftp_socket_and_buffer_size_options

More tests

I did a few more tests to make sure that I didn’t set it too high or too low, but it seemed OK. Going from 64KB to 128KB made the speed hit about 46.4Mbps (5.8MB/s). Better, but not good enough. 256KB buffer allowed me to hit 65.6Mbps (8.2MB/s), which is the maximum I’m likely to get due to protocol overheads.

Assuming that the buffer size doubling also doubles the speed, a buffer of 512KB should allow up to about 192Mbps (24MB/s) which really is more than enough for the things I need it to do. Given my connection is much slower than this, and broadband in the UK doesn’t really hit those speeds either, it should be plenty for now.

Filezilla only allows a maximum buffer size of 999,999 (almost 1024KB or 1MB) so the maximum it should allow (again assuming that the buffer doubling = speed doubling) is about 384Mbps (48MB/s). Other software might allow higher so by all means use it if you need to.


Fiber broadband

Posted by under Servers, Technology, on 24 December 2013 @ 9:30pm.

I posted a few weeks ago about me getting fiber broadband. Well its finally arrived after I called up to get an earlier appointment.

In was quoted 79.9Mbps and that’s exactly what I got on the sync speed. Speed tests give me 75Mbps down and 17Mbps up which is fantastic! The upload speed has already come in incredibly useful for sending files to friends quickly and uploading photos to my websites.

I’ve seen 9MB/s download on files from Microsoft and 2.1MB/s uploading via FTP. I’m certainly not going to complain at all for the extra £4 it’s costing me. I would highly recommend it to anyone who has FTTC available in their area. So far I’ve seen no throttling either which is brilliant. BT have a superior network to handle fiber so its not surprising.

I’m in the process of utilising it more and hopefully I will have a few servers on it soon. I’ll also be using it to download the 7.5TB backup of my site (yes, TB not GB!). I just need to get my 2nd server set up with the backup drives.


Fiber broadband is finally here!

Posted by under Life, Servers, Technology, on 4 December 2013 @ 11:45pm.

For many the fiber broadband revolution started many years ago. Those people that got virgin media for example were given quick speeds from an early age. Those of us stuck on ADSL however weren’t so fortunate. The line length was always a factor and prevented most people getting a fast connection. You would have to be no more than 500m away from the exchange to get anything over 15Mbps. Now that fiber is here that’s a thing of the past.

The new fiber cabs are no more than 200m away from most properties. And because it uses VDSL technology instead of ADSL you also get a bump in speed from that as well. It’s currently capable of 300Mbps with trials of higher in progress. Its something we should have got many years ago.

Anyway the point of this blog is that its finally arrived for me! I’ve been checking weekly for almost 2 years waiting to see the long awaited ‘available now’ message and this week it finally happened.

I initially signed up online and was given a date of early January. I was surprised by this as other people got theirs much faster. I decided I’d be OK with it as I understood they were quite busy. But after speaking to a friend who ordered at the same time as me he got his for next week! I asked how and its because he had phoned up and not done it online. I decided to try my luck phone up to see if I could get an earlier date. Thankfully they could! I was expecting a 2 week wait but they said they could do it next Monday! Brilliant!

I was expecting 65Mbps based on BT’s estimates which isn’t too shabby at all. But when I signed up the email I got said 79.9Mbps. I thought it might have been an error but checking their estimate page again it had been changed! So with any luck I’ll get the maximum that the up to 80Mbps package offers (the fastest package you can buy right now).

I’m just waiting for the BT home hub to come in the post in the next few days and then I’m all set. The engineer is scheduled for Monday to get it swapped and all working. Wish me luck! I’ll probably make another post with my speed test results soon enough!


Solution to webcam issue on Windows Server 2008 R2

Posted by under Servers, on 29 June 2013 @ 6:01pm.
broken-broadcast
Do not adjust your TV set…

After getting a new HP Micro Server I decided it was time to stop using a desktop OS (Windows 7) and move to a proper server OS (Windows Server 2008 R2). It’s a good move in many respects, but the most important is that it’s designed to be a server and run 24/7 where as a desktop OS isn’t.

Everything went smoothly until I got to setting up my CCTV software. I use a regular cheapo webcam for my CCTV needs. It’s simple but it does the job. On Windows 7 this worked great with the exception of USB webcams causing crashes on occasion. The problem I encountered was that the webcam simply didn’t work at all. The driver had been installed, and I even tried a webcam that was driverless (using built in Windows drivers). That also didn’t work. All I was getting was a black screen.

What also struck me as odd is that one of my webcam applications wouldn’t run. Windows 2008 R2 is based on Windows 7, so the application should run without a problem unless an artificial restriction has been put in place. I knew it hadn’t as my friend made the software himself and confirmed it. He suggested it was just a “general incompatibility”.

Regardless, I tried another piece of his software that also dealt with webcams but this also had problems running. However in this case I got a different error message about “wmvcore.dll”. I decided to do a quick search for solutions by copying the error message, and it came up with something I didn’t know about. Windows Server 2008 R2 doesn’t come with the “desktop experience” package installed. This is installed on Windows 7 by default of course, but a server doesn’t require it because it’s not a desktop OS. Part of the desktop experience is Windows Media Player, and this is what the error was referring to. I decided it was a long shot but I installed the desktop experience package.

Low and behold, after it installed (and the system rebooted twice) the webcams were now working! Hurray! It was a simple fix but had I not been able to try the 2nd application I would probably not have found the solution without it’s error message.

So now I’m happy that it’s working. What I’m not happy about is that compared to my old server, this one is a little less powerful so it’s using more of the CPU to run the CCTV software (75-85% rather than 50% or so) but that’s not a huge issue. I’ll monitor it and make sure it’s not affecting backups etc.

I hope this long winded article helps someone else with the same issue I’ve been having.


UPS Battery Woes

Posted by under Servers, on 20 February 2013 @ 9:59pm.

ups
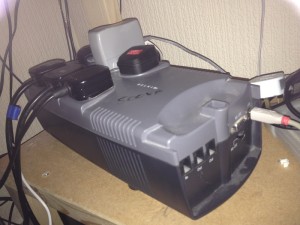
For those of you who don’t know what a UPS is, it’s an uninterruptable power supply, or “battery backup” for your PC/servers and other electrical items which takes over when the mains fails. I have a couple of them, one for my PC, one for my server and one for my network equipment.

Recently, the batteries in one of those UPS’s decided they didn’t want to play anymore and suffered catastrophic failure. This meant that the UPS would no longer hold if the mains power dropped. Typically the batteries should last about 3-5 years but these only lasted a tad over 2 years. I was disappointed but then I began reading why this varies between UPS’s.

I have 2 UPS’s on my desktop PC. One for the monitors and one
for the PC itself. I have it this way because my PC is fairly high end so it can reach a fairly high power usage when being used heavily. A single UPS for all of this was unlikely to hold very long. These UPS’s are about 5 years old and still had their original batteries. I had known for some time these were getting poor but it wasn’t until now I decided to replace them with new ones. I have retired the UPS that had batteries die recently and took the monitors UPS and put that on my server instead. The remaining UPS for my PC now holds one of my monitors and the PC only.

I began to think why these batteries lasted 5 years and still had life in them but these others lasted just 2. I discovered that the “float” voltage, the voltage that the battery is held at once fully charged was likely too high on the UPS that recently died. It tended to hold it at 13.8v. A fully charged 12v battery sits at about 12.8-13.3v. These other UPS’s seem to pulse the power into the battery at around 13.3-13.6v rather than holding it at 13.8v. This is likely the explanation to their longer life, so it makes sense to stop using the other one and use these instead.

This discovered I decided to buy 2 new batteries, one for each UPS. I did my best to select the best brand I could because I read that they tend to last longer as well. However when these batteries arrived they were not the brand I had thought I ordered. Despite this I tried them in my UPS’s anyway and immediately had a problem.

Firstly, I checked the weight of them against the old ones. They were 0.5KG lighter which suggests a lower lead density and thus a lower energy density as well. This was worrying because I opted for the “best brand” available.

batteryAlthough when I got the batteries they were not fully charged, I would have expected them to put out enough power to at least keep the PC’s online and/or boot them up. During testing they would switch to batteries just fine, but they would not start the PC from cold (powered off). This isn’t how a UPS is supposed to work, it should work both ways. During testing these batteries reached 2 minutes of sustained run time before encountering a low battery condition and shutting off. This wasn’t acceptable. The original batteries would have held the load for at least 10-15 minutes!ble. Despite that I carried on with testing.

Unhappy with this I thought I’d let them charge for 24-48 hours and see how that goes. I then tried the test again and managed around the same sustained run time. I contacted the seller on eBay that I got them from and explained I wasn’t happy. He replied saying that they are likely being trickle charged and it could take up to 3-4 days to fully charge them. The specs say 8 hours to fully charge, but they could be wrong. He assured me they were the one of the best brands and suggested I try them again in 3-4 days. He also said the weight difference should offer little difference to their output.

3-4 days later I tried another test and managed 12 and 14 minutes between them. This was significantly better but not quite what I expected. I contacted the seller again who said it might take a couple of charge/discharge cycles to get them to 100%. I agreed as batteries do sometimes need this cycling so I said I would try again in a few more days. It’s only been 2 so I haven’t tested them yet, but I am hopeful that they will be slightly better again.

All in all it’s been a bit of a pain but it was also a learning curve involving a fair amount of research. This leads me on to my next blog about battery knowledge, as I have learned a few things I didn’t know about how to care for batteries recently.


MB, MiB, GB, GiB, what the differences are and why it causes confusion

Posted by under Rants, Servers, on 5 February 2012 @ 7:50pm.

OK so you’ve probably heard of MB and GB (MegaBytes and GigaBytes), they’re used on all sorts of devices from phones to computers. But what are they? Better still, what are MiB and GiB (MibiBytes and GibiBytes)? Well both are units for measuring memory size but they have differences. The difference is that one is calculated using base 2 and one is calculated using base 10.

For these examples we’ll stick to GigaBytes and GibiBytes for our sizes.

A GigaByte that we’re all so used to is base 10 (1,000,000,000 bytes to 1 Gigabyte).
A GibiByte that you may have heard of is in base 2 (1,073,741,824 bytes to 1 GibiByte).

gib-vs-gb-table
Table taken from http://www.pcguide.com/intro/fun/bindec.htm

So why does it cause confusion? Several reasons. Most sizes are referred to in Mega or Giga bytes so many people have been accustomed to this. For example in magazines or advertisements selling electronic equipment (tablet’s, digital cameras, etc.) and computers running Windows they’re referred to as this, but that’s where the confusion comes in, and a bit of a rant because of it.

The difference between 1GiB and 1GB is marginal, but when you increase this to several tens or thousands, it throws the scale way off. Not only that, Windows runs in base 2, but actually displays it using the prefix for base 10. So when you think it’s 1 GigaByte it’s actually showing 1 GibiByte instead but with the wrong unit! I have no idea why Microsoft decided to do this but it’s confusing as hell when you’re trying to work out the differences in file size on a program that really does show it properly. Gah!

The problem I had recently was on one of my sites, BetaArchive. I was trying to find discrepancies in the total archive size counter. It wasn’t showing the right size but we were adamant we had it right. In the end it turned out to be in the units.

Now I believe Mac and Linux use GigaBytes correctly and are also switchable from what I have read, you just have to find the option for it so Windows should have no excuse getting it right. Many people have complained to Microsoft but they’ve never done anything about it for some reason, so this problem continues to plague developers and people like myself trying to work out these discrepancies.

Suffice to say I wasted 2 hours trying to figure out where the missing data was. As a result of this cock-up I’ve even had to put a message next on the display on BetaArchive so people know it’s actually showing the right unit on the site but Windows shows the wrong unit!

I don’t doubt this will plague people for years to come as I doubt it will be fixed in Windows 8 either. I just find it hard to believe Microsoft have got away with it for this long.


Older Posts »