BT FTTP Upgrade from 350/50 to 910/110!

Posted by under Servers, Technology, on 29 March 2020 @ 8:27pm.

It’s been a while since I posted, and ironically my last post was about getting fiber to the premises installed. Well, I recently found out on my travels that I was able to upgrade from what was once the highest tier package.

I was originally on the 300/50 package, and I consistently got those speeds no problem. When I spotted that some areas could get an upgrade to a 910/110 package I was curious to see if I could and what it would cost. To my surprise, when I logged onto my BT account I saw that it was available for me too, and at the same price I was paying right now. So the first thing that went through my mind was why would I not upgrade? Pay the same and get more is never a bad thing, right?

I gave BT a call and spoke to one of their reps. He went through his usual script, and asked what I was using it for. I just said I was streaming a lot and downloading games, etc. to which he said maybe the upgrade would be a good thing. He had a look at what deals were available as he can sometimes get better deals than are shown online. Low and behold he got me a slightly better deal. Rather than £59.99 a month I’ll now be paying £57.99 a month for the 910/110 package. I wasn’t going to argue with that! Now I’m paying less and getting more!

It didn’t take long for him to sort it all out, but he said my activation date would be in 3 days. I was curious as to why a simple upgrade to a fiber line wouldn’t just be a configuration change done automatically, but I didn’t question it. 3 days later it went live and I didn’t even notice until I ran a speed test some time that day… OK, you got me, I was speed testing frequently and it just so happened to go live in between 2 of them!

My first speed test was rather unspectacular (relatively speaking), with a speed of around 450Mbps down and 110Mbps up. I knew that speed tests started to get unreliable at those speeds, but I tried a couple more anyway for fun. I tried going to https://fast.com as they’re hosted a bit more locally. Boom! Pretty much full speed down and definitely full speed up!

Now once again of course this is a speed test so it doesn’t quite show the maximum, but even so it shows that the connection can still achieve far more than I was on previously. Now anyone that knows me should know that wasn’t enough, so I went out thinking of another way to test it. What better way than Steam when downloading a huge game. They have massive amounts bandwidth available and they’re well known for providing extremely good speeds (most of the time).

I found a large game that I had on my list and deleted it. In this case it was Destiny 2, an 86.8GB game. This was the result:

101.2MB/s peak! But that’s only(!) 810Mbps. Not quite as high as the speed test above though which was a shame, but still a great result because it was a real life transfer and not just a speed test.

I’m not sure if there is a bottleneck in my setup or overheads are quite large, or maybe I just can’t quite get those speeds from single sources. Either way its proven itself to be extremely quick, and to be honest it’s rare that I’ll even use it anyway! I’ll need to run some tests on my pfSense router configuration to see if it’s a CPU bottleneck or not, but it’s not a big deal.

I can’t imagine that BT will make any faster services any time soon because that would require getting new Ethernet cards and other networking equipment for consumers, but I don’t think it’ll matter for some time. Almost gigabit Internet is going to be more than fast enough for even the most taxing households where there are half a dozen kids and several adults all wanting to do streaming, gaming or downloads. One of the LAN party events that I regularly attend has a 1Gbps symmetric line and it copes just fine with nearly 800 people using it, so if you are using more than this line can give then you probably (definitely!) need to get out more…!


BT FTTP – Installation, failure and using the BT 4G Mini Hub

Posted by under Servers, Technology, on 3 September 2019 @ 10:48pm.

It’s been a long time coming, but BT finally got off their backsides and decided that full fibre broadband in the UK was finally needed. Luckily for me I live in one of the first areas of the UK to receive it (Wirral). Once I saw the fibre cables being installed I began to keep check on the BT broadband checker and Thinkbroadband’s maps to see when it would finally become available. I saw lots of installations popping up on the map as speedtests began to be performed and realised it must be quite close. I checked for weeks on end, and nothing changed. Every road around me was seeing speedtests, but mine and the couple directly connected to mine weren’t getting any.

I contacted BT to see what the delay was. They said contact Openreach so I did, and they said that it could be any time now. Great! I kept checking, and another 2 weeks went by and then one day it finally popped up as available. Hurrah! I quickly ordered it and got an installation date for 3 weeks later.

The day came and the install went pretty smoothly. The engineer was here for about 90 minutes running the cable from the pole to my property and then drilling a hole for it to enter into the living room. He installed the FTTP modem (also known as the ONT) and I had already received the BT Smart Hub 2 in the post. 10 minutes later it was installed and a speedtest showed that I got around 284Mbps downstream and 51Mbps upstream for the 300/50 connection that I was paying for. Not too bad! Upon looking in the BT Smart Hub settings I could see that the sync speed was 1000Mbps/1000Mbps, but it must be being limited in speed back at the cabinet to the speed I’m paying for.

BT FTTP Speedtest

So it’s all installed and the engineer goes off to his next job. I quickly decided to route it through my PFSense box the same way I had my FTTC connection routed. It didn’t take me long to set up as the method was identical. I simply turn on DMZ mode in the router, give it a known static IP on the 192.168.0.x range, connect it to PFSense, I then set up all my port forwarding as needed within PFSense and let it handle the local network DHCP on the 192.168.1.x range. Everything worked smoothly.

Fibre Failure

I say it worked smoothly, up until yesterday that is. I was browsing and suddenly there was no internet connection. The smart hub was flashing and the modem PON light was flashing, indicating that it had lost connection. I waited a while (10 minutes or so) to see if it came back and it didn’t, so I got on the phone to support. Top tip, dialing 150 from your landline if its also on BT gets you through much quicker than phoning the 0800 number, especially if you have BT Plus which appears to get priority support.

They ran some tests, got me to power cycle the modem and route, and eventually determined that there was a fault somewhere. They said that because I had BT Plus they would send out a “Mini Hub” which is basically a 4G dongle that you can connect your wifi capable devices to. I’d be without internet until it arrived, but after that it would have unlimited usage until my connection was fixed. I was told I’d missed the next day delivery cut-off but a few hours later I got an e-mail saying I’d get it the next day, so I definitely got lucky there!

BT Mini Hub Box

BT Mini Hub

In the mean time I could use BT’s hotspots, and luckily one of my neighbours also has BT so I could piggyback off that for a while using my logins. Shortly after doing that I had a light bulb moment. I remember years ago when I had BT and I also had access to the hotspots I connected my laptop to one and bridged the connection to the ethernet port, which I then fed into my regular router’s WAN port. It got my entire network back online for the day or two my regular connection was down. But try as I might this time I just could not get my laptop to connect to the hotspot. I didn’t keep trying for too long as I had better things to do, but it would have been great if I could do that.

In the mean time I connected my phone to my computer via USB and connected to the internet that way. It shows up as a virtual Ethernet adapter when connected via USB so it gives internet directly to the computer.

2 hours later my fibre connection mysteriously came back so the fault, whatever it was, must have cleared.

BT Mini Hub

So the hub arrived today and I set about having a play with it. Despite my connection now working again, the BT Mini Hub was still activated. Apparently they turn it off once the fault is fixed and can turn it on again within minutes if a fault occurs again.

I connected my phone to it and did a speedtest. This gave speeds of about 8Mbps down and 7Mbps up, which is plenty to at least get me back online. It runs on the EE network (owned by BT) but clearly it is restricted in speed because it’s got unlimited data, and they obviously don’t want you slurping up all the bandwidth. I’m fine with that as it’s not a ridiculously slow speed, but it’s not even close to what I would normally get either. The important thing is that I can get back online.

Whilst using it I was thinking to myself why they didn’t make it possible to connect your desktop computer to it as well, or have the smart hub connect to the mini hub and distribute the connection that way. I would assume it’s because nearly everyone will have at least one device which can connect via wifi and that a day or two without your desktop computer probably isn’t going to be a major issue.

I thought about doing the wifi bridging option with my laptop like I tried earlier but then I tried plugging it into my computer. Low and behold it shows up as a virtual Ethernet Adapter just like my phone did. I disconnected my Ethernet cable to ensure I wasn’t using my normal connection, and it worked perfectly. Internet was going from the BT Mini Hub directly to my desktop PC using a virtual Ethernet adapter.

That got me thinking that perhaps I could connect it to my PFSense box directly and have it set up as a fail-over connection, so if a fault ever occurs again the hub will just take over as soon as its activated. I might experiment with this before it gets turned off otherwise I would have to put another SIM card in or simulate the same setup using my mobile phone instead. I could also do similar with a wireless USB adapter connected to a BT’s hotspot, so that way assuming it’s just my connection that fails the hotspot should take over. I’d just need to find a way to keep it permanently logged in.

These are all good ideas that I’ll have to try out. I suppose the best way is just to have a mobile data contract and dongle permanently connected. Since unlimited packages are starting to become available now if it ever got to the point where I needed to guarantee my connection was alive I could get one of those connected straight into PFSense.

By the way, you can also connect the BT FTTP modem directly into PFSense if you set up a PPPoE connection too. It’s a bit fiddly but works fine when its set up properly. If you want to set it up the username is bthomehub@btbroadband.com and the password is usually empty or just “BT”.

Hopefully what I have found out helps or inspires you to try something similar 😉


Lexus CT200h – Temperature, MPG and BSFC

Posted by under Hybrid & EV Vehicles, on 8 April 2019 @ 10:29pm.

I thought since I’ve not posted for a while that I’d share some more data with you. For almost 3 years I’ve been logging every fill up at the pump to put together the graph you see above (among others).

So what is the graph showing? Simple – it’s a scatter chart between MPG from a tank of fuel versus the (roughly) average temperature during that time. (Note that the colour grading was added by me and only shows my personal acceptable ranges).

The MPG data comes directly from the mileage covered and the amount fueled, converted into miles per gallon. The temperature data is recorded at home every 60 seconds and stored in a database. I can pull the temperature for any time on any day over the last 3-4 years at home. This is the data I use for the average temperature. It’s only a rough guide, but it helps to show the pattern.

What we can see is that temperature has a very significant effect on the fuel economy of the engine and hybrid system. The warmer the ambient temperature, the more efficient they are, yielding a higher miles per gallon. Obviously this drops off the higher up the scale we go because the engine has its efficiency limits (and data up that end is limited so accuracy is lower).

You can see the relationship between temperature, MPG and the time of year on this graph:

My driving split is around 25% town and 75% motorway with typical journeys being around 15 miles. My typical motorway speed is between 60-70mph.

BSFC (Brake Specific Fuel Consumption)

Most people probably haven’t heard of this one. I’ll try to keep it as simple as I can. Here is the Wikipedia definition:

Brake specific fuel consumption (BSFC) is a measure of the fuel efficiency of any prime mover that burns fuel and produces rotational, or shaft, power. It is typically used for comparing the efficiency of internal combustion engines with a shaft output.

Commonly BSFC is expressed in units of grams per kilowatt-hour (g/(kW·h)).”– Wikipedia

So basically what it means is how much useful power can be produced for the amount of fuel injected based on engine speed and engine load.

Below are BSFC charts for the 2nd and 3rd generation Toyota Prius. The CT200h is based on the 3rd generation, so we’ll be focusing on the right hand graph.

BSFC is something I didn’t realise existed until around a year ago when I was looking on various forums to understand how the engine remained efficient. The entire system is designed around the BSFC chart to ensure that when the vehicle is being used normally, say on the motorway at a typical cruising speed of say 75mph (120km/h), it would sit in the most efficient part of the BSFC chart, producing power at its most efficient point.

This doesn’t mean that it’s producing a lot of power, but it’s producing it as efficiently as possible. In this case, it’s only producing about 22kW of power and 95Nm of torque. This is enough to cruise on a flat road as efficiently as possible.

Now, an engine can operate wildly at both sides of this in both power and torque requirements, and that’s where things start to go horribly wrong. You can very quickly fall outside of this efficiency range. Too much or too little torque, and you leave the efficiency band. Too much or too little engine RPM, and the same thing happens. This is why the hybrid system is designed the way it is – it tries to keep the engine in the most efficient part of the BSFC chart as possible.

The hybrid synergy drive eCVT gearbox is best suited to this task because of the precise control it can have over the power delivery. If it needs to load up the engine to get it into the efficiency band it can do so by generating power through MG1 and then sending that power to the wheels or the battery. Of course this still has limitations, but it’s an improvement over a regular auto or manual gearbox.

Unfortunately the nature of how we drive – speeding up, slowing down, going slow, going fast – they all put it outside of this band far too frequently. It can only manage to keep inside the efficiency band under certain conditions.

Recently I discovered that Toyota and Lexus try to help you stay in the efficient part of the BSFC chart in the most simple way they can. The power meter on the dashboard… Obvious when you think about it!

There are 3 bands – Charge, Eco and Power. The most efficient part of the BSFC chart sits within the Eco area. If you can keep your use to this area you’ll stay as efficient as possible. However, you won’t have much power to get your vehicle up to speed or go up any sizable hill, so you will need to use the power band sometimes.

Generally the rule of thumb is to accelerate as gently as possible to stay within this BSFC band, and I found that this does work after lots of experimenting. You can combine this technique with pulse and glide, general coasting, driving a little slower, and more to maximise fuel efficiency.

These days I’ve become less and less focused on the fuel efficiency because I now know what the system can do. It can still achieve fuel economy far above a regular petrol engine – I have averaged 52mpg since beginning ownership, with peaks up to 61mpg and the lowest I saw from a tank was 47mpg.

Lets be honest, you’re never going to save huge amounts of money because you’ve opted for a hybrid as you’ll offset a lot of that in the purchase cost. However the more miles you drive the more you’ll save in fuel, and you’ll pump less harmful emissions into the environment too if that’s on your personal agenda. And if you want to go one step further on that agenda, buy a fully electric vehicle instead! 🙂


2 years with the Lexus CT200h

Posted by under Hybrid & EV Vehicles, on 22 July 2018 @ 11:01pm.

Just over 2 years ago I finally parted with a horrific car that turned into a money pit and went with a car I had been dreaming of owning for months after taking my first test drive.

So how has the last 2 years been for me? Well, lets see what I can tell you.

Cost of ownership

The cost for this car admittedly wasn’t cheap. Although I didn’t buy new, I still spent more than I initially intended to on the car. Despite this, it still worked out to be a very good deal. I have been keeping track of all costs associated with the car in a spreadsheet – I’m a bit of a data geek (freak?!).

Ignoring initial cost to buy, this is what I have spent in 2 years:

Fuel: £2096

Parts/Repairs/Servicing: £1415

This breaks down into 2 services/MOTs done by the dealer (you could get cheaper elsewhere but this gives full service history), 2 front tyres and tracking (potholes!), 12v battery (for my peace of mind, old one was OK), a set of front and rear wipers.

I also took out the 2 years extended warranty for £495 so I have included that even though I’m paying for it over 12 months. The extended warranty now means I have to use authorised servicing for it to remain valid.

That works out at £146 a month roughly minus the cost of the car purchase. Just over half of that cost is fuel (approx £85/mo).

Economy

The big phrase I always hear is “hybrids don’t work!”. Wrong, they do work. My ownership is proof to myself that they worked because even I wasn’t 100% sure they did (I took a gamble).

“But they use horrible materials that affect the environment”. Sure they do, so does any vehicle. But the gains outweigh the benefit over the lifetime of the vehicle. I have emphasised this because this is the bit people miss. It works over its lifetime, not immediately.

Anyway down to the point.

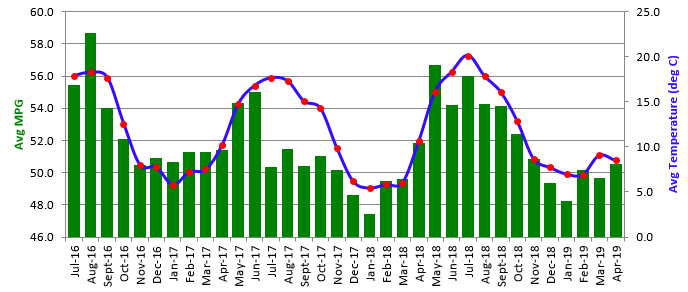
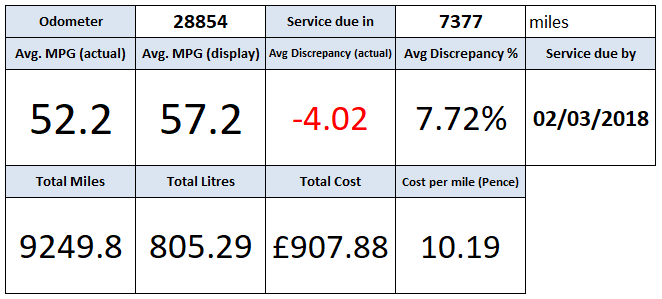
My average fuel economy over 2 years and 20456 miles has been… 52.2MPG (UK). This figure was calculated manually through filling the tank full each time. For those wondering, the car thinks it was doing 56.3MPG which is about 4.1MPG too high. Most cars will tend to over-read. My last car by comparison managed about 42-46mpg (winter-summer) and no higher no matter how much I tried.

I should add that I never turn my air conditioning off either, so these figures are with a/c on all year around.

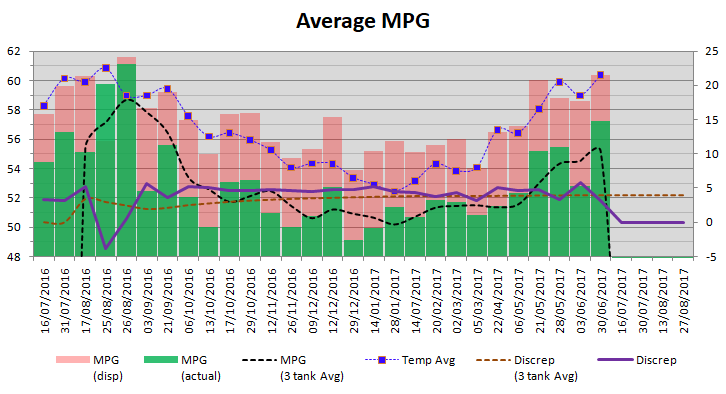
Here is a ALL of my data that I have recorded over the 2 years:

Download: Lexus CT200h Fuel Tracker July 2016 – July 2018 (Excel Spreadsheet)

My best MPG I have ever achieved was 61.1MPG in August 2016 shortly after getting the car. This was driving at 70mph on the motorways for about 150 miles. I did use cruise control.

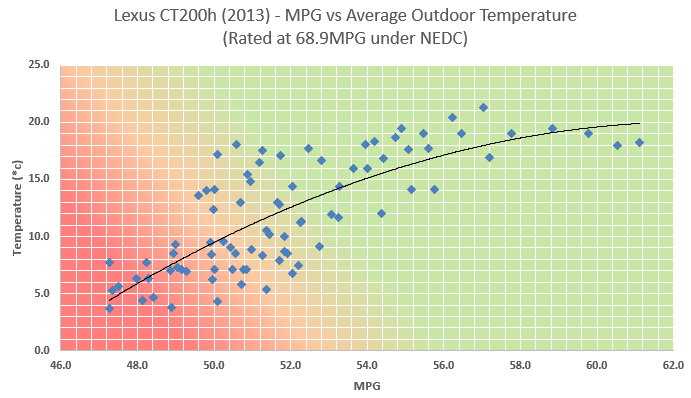
More recently during the May 2018 heatwave here in the UK I did two 250 mile trips and I managed 57.7MPG (UK) and 58.8MPG (UK). I was driving at 70mph (using cruise control) on A roads and motorways for the majority of the journeys and the average outdoor temperature was easily over 20 degrees celsius for both journeys. Higher outdoor air temperature massively helps economy for most cars but more so hybrids because they heat up quicker and the hybrid battery is more efficient at those temperatures.

In all of the above journeys I made no attempt to ‘hypermile’, it’s just what it achieved through normal driving and use of cruise control. Yeah, it impressed me too…

Driving

At first the eCVT gearbox felt odd. No other car I had driven acted the way this gearbox does but you soon get used to it. The engine does scream a little bit but again you get used to it.

Being a bit of a geek I familiarised myself with the way the car worked – I looked for how the gearbox worked, how the hybrid system interacts with the way you drive, how it behaves, etc. Now that I know how it works I was able to be aware of situations that affect the way it works positively and negatively.

The biggest factors I have found are temperature and gliding.

Temperature outdoors affects the hybrid system negatively. It affects the engine and the battery so both run less efficiently. In cold weather when you need heat the engine has to run to produce that heat, so you lose economy. Some newer hybrids use heat pump systems (reverse air conditioning) to give cabin heat without the engine running which is 400% more efficient than resistance heating elements alone, then the efficiency savings on top of not burning fuel. Since the engine is very thermally efficient it takes longer to get warm, but once the engine is able to turn off it will regain some of the lost efficiency.

I’ll say this immediately – if you do short journeys most of the time then a regular hybrid won’t be beneficial for you. Get a plug-in hybrid or EV instead.

Gliding – this is the process of getting up to speed using the engine and then either using the battery power to maintain your speed or you coast until you need to speed up again. The latter being the most efficient method but also the more demanding of your attention. Using battery is still more efficient at lower speeds than the engine. Sadly the CT200h only drives for about 1 mile using battery power before the engine has to recharge it. It’s best to time using battery power so that you can recharge what you have used when the engine has to be on anyway at higher speeds or inclines.

Regen braking is a new one to get used to as well. This uses the motor as a generator to charge the battery, capturing energy which would otherwise be lost in the brakes. This causes drag slowing the car down. By about 6mph the car switches back to regular brakes to come to a complete stop. This transition is usually not noticeable but sometimes you do feel it grab a bit more than it perhaps should. I’d prefer this over it not working as effectively however.

Which brings me to another point – sometimes you will lose regen completely while braking which happens if the ABS kicks in. To prevent the wheels locking it cuts off regen and switches to normal brakes seemlessly. However you do notice a slight ‘lurch’ as it switches over because it’s not instant. It’s a common complaint that has never been addressed because it’s classed as normal operation. Thankfully the CT200h has emergency brake assist which means if you hit the pedal hard quickly it will give you added braking force automatically. This system has saved me once or twice too.

You do get used to its quirks but for the most part it works great.

In terms of general driving, the car is a dream to drive. It’s smooth in every way, it’s firmly stuck to the road, and it’s quiet unless you’re really giving it some right foot.

How would I change the car if I could?

There are a few things I’d improve if I could.

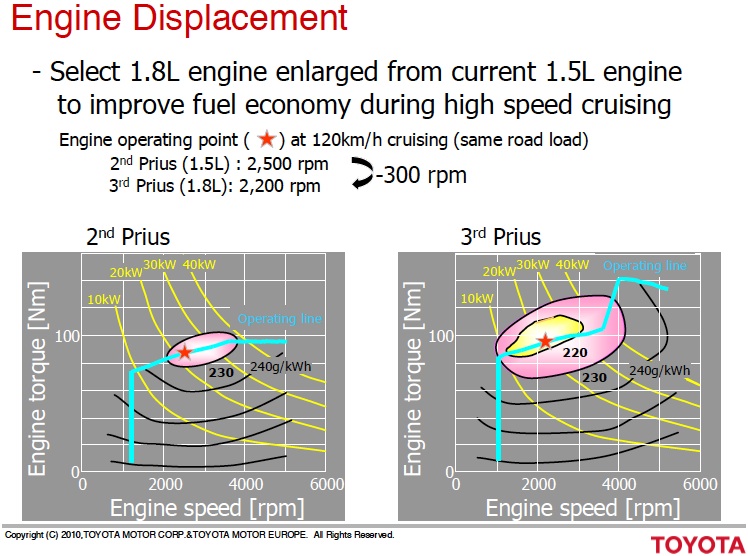
  • Hybrid power delivery – Sometimes it feels like the hybrid system could use the battery more, especially when climbing hills or during moderate acceleration. I believe this might have been addressed with the latest 2.0L hybrid system from Toyota/Lexus which we’ll see in the new Toyota Auris and some Lexus models. I did read somewhere that this was a common complaint so they’d addressed it. It’ll be interesting to see if it’s true.


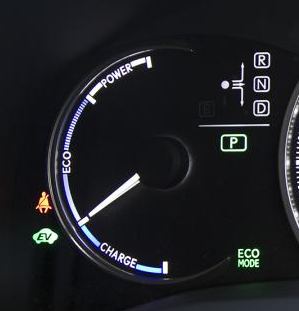
  • Also, the battery can’t provide a lot of power. It can only do about 34HP and only when its fully charged and only up to about 25mph (temperature dependent). And you have to use the EV mode button which doesn’t always work as it’s picky about temperature and battery state of charge. I’d like to see it do this throughout the battery range and up to speeds of 40mph for local driving.


  • Hybrid battery capacity – 1 mile range is alright, but it would be nice to see a larger battery that could allow 3-5 miles of electric only driving for example. That would mean I could go shopping and back without the engine firing up since it takes about 1-2 miles for the engine to get up to an efficient working temperature anyway. For short journeys it avoids that problem. This would be mid-way between a hybrid and a plug-in hybrid.


  • Heat pump heating – I know this is in newer models already but it would’ve been nice to see in all models too. It seems such an obvious solution to the heating issues in winter.


  • Regen braking – The car has regen braking but it’s not very strong. I’d like to see that improved by at least 2 or 3 times. I believe the current regen is restricted by the charging speed of the battery, so perhaps this issue could be supplemented with super capacitors or a larger battery.

Did I make the right choice?

Yes! I love the car. I did a lot of research before I bought it and I’m happy with what I got. I went into it with as much knowledge as possible and it’s not let me down on my expectations to date, despite the improvements I would like to see having owned it a while.

I’m not sure what else to add, so I’ll leave it there. I know this blog is a bit all over the place (I’m making this up as I go – I never had a structure when I started out!). But hopefully it’s given you some insight into ownership.


A year with the Fitbit Blaze – How it helped me lose weight

Posted by under Electronics, on 1 April 2018 @ 7:12pm.

I’ve had my Fitbit Blaze for a year now so I thought I’d just do a quick post about how it’s helped me lose weight and keep in shape.

Fitbit Blaze

After a health scare earlier in the year it kicked me into gear on getting myself into better shape. Not only that but also eating healthier was on the agenda. One of the things I wanted to try was calorie counting with a calorie deficit of 500 calories per day to make sure what I was eating didn’t exceed what I was burning, as well as deficit so I was able to lose weight. Boy was I surprised! My typical intake was always over what I was using in my typical day at the time.

My diet back then consisted of anything you could put in the freezer and cook in the oven for 25 minutes. Those sorts of things tend to be high in calories just in general, and one of the biggest offenders were chips and pizza. Any type of carbohydrates are huge on calories, so it was definitely time to cut back on those.

The other offenders were chocolate and biscuits, or chocolate biscuits if you want it twice as bad! I used to eat a lot of them as a snack after work and before my dinner. Those are also off the list.

To change what I was eating I initially tried to eat just healthy food – potatoes, vegetables and protein (chicken for example). That went well for a few weeks but I was finding it boring. The taste of the food was pretty bland and I have no culinary skills to ‘spice’ things up a bit. With that in mind, I kept eating healthy food but also mixed it up a little during the week. I saw no need to eat healthy food every single day, but as long as I was combining it with things that I liked too it should work out OK. Cutting back on portion sizes helped me with this a lot.

In the end, I only calorie counted for about 3-4 months, and then I stopped. By that point I was easily able to judge the calories in what I was eating so I didn’t need to track them anymore.

Along with the change in diet I began walking during my lunch break in work as many times a week as I could. I typically walked for about 45 minutes which was about 2-2.5 miles. That racks up about 300-400 calories burned each day. I still do this now a year later and it’s become a good habit.

My weight loss goal after just 3-4 months was about 75% complete. I was pretty happy with that as I hadn’t been close to that weight for around 6-7 years. I continued anyway and I still do today, but now that my weight is where I want it I’m able to eat more calories to keep my weight stable, so that means I can eat more of the things I like again like chocolate! I still eat healthily at least 2-3 times a week, semi-healthily 1-2 times a week and the weekend is free reign on whatever I like.

I still wear the Fitbit Blaze today as a regular smart watch. The fitness side of it is now just a bonus. That said, I think I’d still buy another Fitbit if this one broke because it’s been a very good device. I always get 3-4 days battery life, sometimes 5 days. It’s never given me any less so it’s not a hassle to charge it. It also gives a good 24 hours notice on when it needs a recharge which is awesome considering some smart watches can’t even give you a day in the first place!

I’d say it was a very good £130 well spent.


Home automation using Alexa and Hive

Posted by under Electronics, on 20 January 2018 @ 3:10pm.

This is something I’ve wanted to do for a while, and for Christmas I was fortunate enough to get an Amazon Echo Dot and some smart Hive bulbs.

There are different combinations of systems out there including Google Home and Google Assistant to compete with Alexa, and Philips Hue to compete with Hive, and they all have their pros and cons (something I’m realising now). Alexa does a very good job at serving my needs so far, and Google Assistant which I can use on my phone supplements that.

At the moment I am able to control 2 lights in my flat using Alexa, an Android app and Google Assistant. I mostly use them on a timed schedule to turn on and off at set times, but I do have the option of controlling via Alexa and Google Assistant as well. It’s surprising how often you may want to turn your light on and off but never realise that you do it. You take it for granted when you flick the switch on the wall.

Something I find nice with the Hive bulbs is that you can dim them from 5-100% in 10% steps (5% for the first step). This is nice if you want to leave a light on overnight or late evening but dimmer so that you don’t hurt your eyes if you need to get up for the toilet. Personally I have my hallway light dim at 11pm to 50% and then again at midnight to 5% until 1am when it turns off. It also helps me to keep track of the time.

The bulbs don’t dim gradually, they just jump straight to that setting. Philips Hue bulbs on the other hand apparently don’t do this, but they’re also much more expensive (about twice the price). So you get what you pay for in that respect.

You can also get RGBW bulbs; these are multi colour with a separate white so that you get a true white not a mixed colour white. I don’t have any of those yet but I have seen examples where they can give some great results to the ambiance of the room. The cost of those is also quite high!

So besides bulbs what else can you control? Well, anything that can be internet connected in theory. That could be a toaster, microwave, kettle, washing machine, a roomba vacuum cleaner, anything really. Hive do some other sensors such as door and window sensors, cameras, motion sensors and moisture detectors which would be useful to those that are very security conscious. I was considering a door sensor in the future but not at the prices they are currently sold for. They’re just not worth that kind of money (£25+). A white only bulb alone is £16 from Hive at the moment.

Hopefully in time the prices will drop or I can get some good deals when they’re on offer.


Using my HP DL380 G6 and HP N54L together

Posted by under Servers, on 23 October 2017 @ 10:58pm.

Having now had time to set up and play with my new server, I have now given it proper tasks of running virtual machines rather than just sitting idle.

One of those tasks include running PFSense, a router operating system designed to handle the same tasks as your regular router but on a larger scale. It handles DHCP, routing, port forwarding, etc. This will give me more control over my internal network including the ability to monitor it better. My original router is still in the loop since it is also the VDSL modem, but it is fully DMZ to the PFSense so it acts like it’s not even there. PFSense does still get a local IP on the WAN port though.

Now that I am using the DL380 properly, this means I could retire the N45L from its original job as being the sole server. Since the DL380 only has 2.5″ drive bays this meant that I was unable to use my existing 3.5″ drives unless I found another solution. I was able to re-use the N54L as a NAS by using the FreeNAS OS. This turns the system into a fully fledged NAS to work in any way that I liked.

I had been dabbling with the use of iSCSI attached drives, but found Windows’ implementation poor as it required the use of a virtual hard drive container file to store everything. I didn’t like this because corruption of that file means anything contained within it is lost. For a virtual OS this is not so bad but for my regular data this was not an option. Thankfully, FreeNAS’s implementation allows you to just use a physical disk over iSCSI so that’s what I have done. This is then attached directly to the appropriate VM on the DL380.

The original N54L roles have now been switched to a VM on the DL380. This gives it more power to handle things like the CCTV, my web development setup, my Plex server that I am now able to run thanks to the additional power, and more should I ever need it.

At present the system has only 24GB of RAM with the main server VM using 8GB of that (up to 12GB dynamic). PFSense is allocated 2GB. That gives me plenty to start up more machines if I need it. A friend also passed to me another 48GB of RAM to add when I get the chance bringing the total to 72GB. That will be more than enough for me for the foreseeable future.

Eventually I will run other things on the server including a Steam cache (which I successfully trialled at the weekend and it works great). I just need some additional storage caddies so I can put in some more local drives. Without local drives I will be limited by the network connection to the NAS (1Gbps at present). Future plans include trying to team two NIC’s together for a 2Gbps NAS connection.

All in all it’s been a fun experience so far. One thing I did notice though is that my electricity bill has now doubled thanks to the server using a fair bit of power, but that aside it’s working just as I intended.

This is my setup at the moment. One of the N54L’s is a NAS and the DL380 on the bottom. At the top you can see my HP 1800-8G switch and BT Homehub 5 router/modem. In future I plan to get a rack to put these in but I just don’t have the space at the moment.


Server Virtualisation – A New Journey

Posted by under Servers, on 5 September 2017 @ 7:45pm.

Recently I managed to acquire myself an old HP DL380 G6 rack server. It’s the kind that you would find in a data center or business server rack. For just £125 it has 2x Intel Xeon processors and 24GB DDR3 ECC memory, a fully fledged RAID controller and redundant power supplies. It’s the kind of upgrade I needed for my ageing HP N54L micro servers.

Because of the amount of power that it holds processing wise, I decided it would be time to try out virtualisation. I decided to go with Microsoft Hyper-V because I’m familiar with Windows operating systems. I haven’t really had time to play with this server too much but I did get PFSense set up as my router as a virtualised operating system, and it’s working very well.

I gained a little experience from doing this and even more recently I decided to upgrade my web server (the one running this website) to a new one, allowing virtualisation. It has an Intel Core i7-7700, 32GB RAM and 2x500GB SSD’s. I currently run BetaArchive, this website and several others for friends from the server.

To separate BetaArchive from the rest I decided to virtualise the whole machine and install two operating systems and gave them both their own IP addresses. I had never done this before so I had to learn how to assign IP’s to each virtual machine as well as understand how the virtual hard disks worked (fixed sizes, dynamic sizes, etc). It’s all very complicated, and that’s the basic parts of it.

One thing that I did find when doing this on both my home server and web server is that SSD drives are an absolute must. Without them your system will run extremely slow because they just aren’t quick enough with standard mechanical drives. That quickly led me on to an issue that made me spend all day thinking there was a hardware issue with the new web server. I discovered that when I ran drive benchmarks that the SSD’s were not performing the way I expected. The reading was mostly OK but the writing was slow. I couldn’t understand it. I thought there was a disk issue so I asked for a replacement since the 2nd disk seemed to be OK.

The disk was replaced and I saw no change. I then theorised it might be a SATA cable issue so I asked for that to be changed. Again no difference. I then asked for the whole server to be swapped out except for the disks, and again, no difference! What?! That made no sense, so it had to be a software issue. For another 2 hours I was stumped, and then it clicked.

Kicking myself, I checked the drive cache settings. Write caching was disabled. Doh! Turning it on instantly gave the speed boost I was expecting. Why it was off by default I don’t know. Is it always off by default? I’ve honestly never noticed this on other systems that I have installed SSD’s into. I feel sorry for the tech that had to do all of those swaps for me!

Disk I/O problems isn’t something just caused by virtualising, but it is very noticeable when you try to run multiple machines at once and they fight for disk I/O. If one machine uses up all of the I/O, the other systems can lock up – not ideal! Thankfully you can restrict the maximum amount of I/O that each machine is allowed to use, as well as give each machine a minimum I/O that it is allowed to be restricted to if another machine is using a lot of I/O too. This stops one from using it all and starving the other.

So now that this is set up, everything is running just great. There are other considerations to make such as RAM and CPU allocation, but you can set up minimums and maximums for those as well.

Hopefully this is something that I can get into more and work with at home when I find the time to do it. The biggest issue I have at home is that my disks are 3.5″ disks but the new server only takes 2.5″, so I will need to use the old one as a storage array. I’ll get around to it. Eventually…


Hybrids in hot and cold weather – 1 year with the Lexus CT200h

Posted by under Hybrid & EV Vehicles, on 2 July 2017 @ 8:06pm.

I’ve had my Lexus CT200h for 1 year now, and in that time I have been logging my fuel economy on a spreadsheet so that I can get an idea of how it performs over the year with different driving types and different temperatures.

Here are some notes to add before we look at the data:

  • Most of my driving is commuting 15 miles per direction, and I tried to average around 60mph for the majority of this 1 year period for the sake of this test.
  • Long journeys, which I do a few times a year, were done at 70mph.
  • Short journeys to the supermarket once or twice per week.
  • In March 2017 I did barely any driving, but this shouldn’t have impacted the data.
  • I was using “pulse and glide” after I discovered it, for the majority of the year.


Hopefully most this table should be self explanatory. Discrepancy is the difference between what MPG the car said it got and what was worked out on a fill up.


The graph looks complicated but is quite simple.

  • The green bars represent the real MPG as calculated by filling the tank
  • The red bars represent the MPG the car said it was getting.
  • The blue line is a representation of outdoor temperature calculated by taking 2 values, the minimum and maximum temperatures during that tank of fuel, and averaging them. It’s not an accurate representation of outdoor temperature (I would have to log it all the time to do that) but an average representation so you can see a trend.
  • The dark orange line is the average discrepancy in MPG between the actual MPG and what the car said it was getting.
  • The purple line is the discrepancy for that tank of fuel.
  • The black line is a running average MPG calculated over the last 3 tanks, to make it easier to compare with temperature.


OK, how you’ve had a second to digest the data on the graph, lets talk about it.

What is the first thing we can tell from this data?

Plain and simply, hybrids work better when it’s warmer. Why? Because the engine gets up to working temperature quicker and which means it can shut off the engine earlier so the electric part of the hybrid system can do what it is designed to do. You can apply this rule to pretty much any vehicle.

Why is there a discrepancy between the displayed and actual MPG?

This can be caused by a few things, with the most likely being speedo calibration. The vehicle reads about 4mph too high at 66mph (so it’s reading 70mph at this point) as checked by GPS, which is a 5.8% difference. Tyres can cause this but I just got new tyres and it looks to be the same (though I haven’t checked it accurately, only via the speed limit symbol on the GPS turning red when you speed). Most cars in the UK over read very slightly.

This 5.8% is mostly accounted for in the 5-9% discrepancy that we see in the data (I’ll share the full Excel document at the end of this blog which contains more data). The remaining could be put down to tyre pattern and pressures, weight in the vehicle, etc.

Once you know roughly how far out your vehicle is, it’s easy to take the reading and subtract a few MPG to get the real MPG.

What economy do I get at XX mph?

As a rough estimate based on my observations:

  • <35mpg in town on a short journey from cold
  • >50mpg in town if engine is warm
  • ~53mpg at 60mph on a 15mi journey
  • ~53mpg at 70mph on a long journey


These figures will change based on your driving style, how much you demand from the heating or A/C, weight, tyre pressures, your driving route, etc.

What average economy do I get?

According to all of the data that I have collected, which is every fuel-up for 1 year, and with a mix of driving types and speeds, I saw an average of 52.2mpg over the 12 month period. This is 30% below the rated 74.3mpg combined rating, which was expected because these ratings are recorded under artificial conditions.

The highest I saw was 61.1mpg on a long journey at 70mph, where I barely had to change speed for 150 miles and it was pretty warm. I don’t know if this was fluke or real, but I have never managed an MPG this high since. Temperature has only just reached similar conditions recently so this is likely why.

Everything else aside, 52.2mpg is impressive for a vehicle running a petrol engine, and outperforms many diesel vehicles too.

My previous car, a VW Passat 2.0 TDI was managing around 44-46mpg. I have friends with diesel vehicles such as a Ford Mondeo 2.0 TDCI which averages around 45mpg.

Whilst there are cars out there that will do more than 52.2mpg, chances are they aren’t doing it whilst abiding by emissions laws (remember the whole dieselgate scandal from VW).

The average economy of the CT200h on Fuelly.com shows as being around 49mpg, which means that I was driving a little above the average economy wise, probably due to going most places at 60mph for this test.

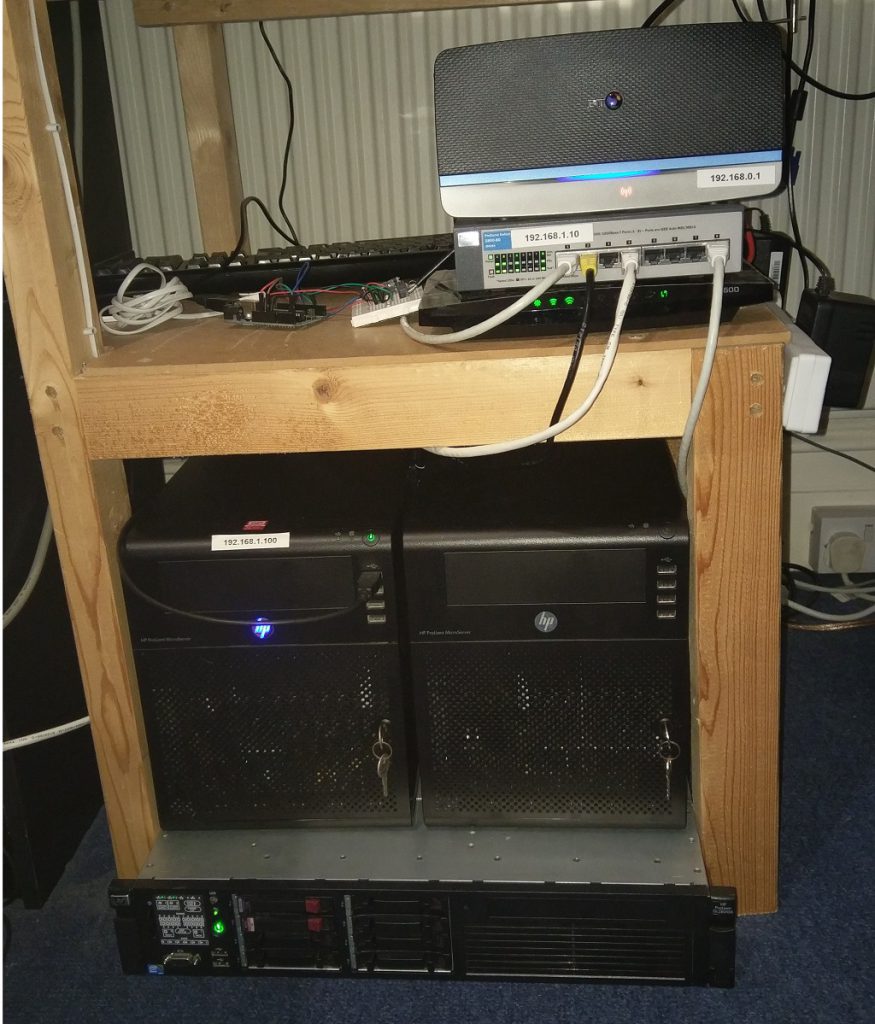
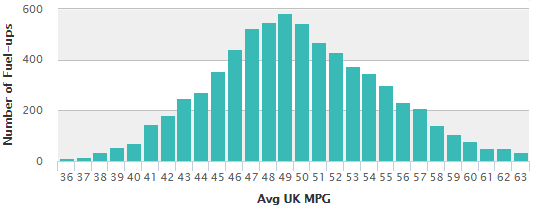
2013 Lexus CT200h average fuel economy. Source: Fuelly.com

Summary

So, do hybrids really work? Yes, they do, at least in my personal experience. But there are still conditions under which they’ll perform no better than any other car, with the biggest being in cold weather and short journeys. If you have a particularly heavy right foot all the time you may also not see much benefit, but I can’t testify to that.

Downloads

Lexus CT200h – 1 year of economy data – 50KB


Arduino PWM Charge Controller V3

Posted by under Electronics, on 4 June 2017 @ 12:49pm.

This project has been a relatively long time in the making, but here it is, the next iteration of the controller.

Specifications

  • 3x P-Channel FQP27P06 in parallel for lower total resistance
  • Low quiescent current 5v regulator for minimal power consumption
  • 2x40A diodes in parallel for lower total resistance
  • 30A hall effect current sensor
  • Modular design to enable upgrading of the power board
  • Current design limit 10A (may be capable of more but untested)
  • Power consumption: 7mA (no solar input) to 35mA

Features

  • Voltage reading (accurate to +/- 0.02v) for battery and solar panel
    • Translates into a percentage reading with hysteresis
    • Software over-voltage protection
  • Current reading (accurate to +/- 0.1A)
    • Continuous polling
    • Records power flow in Ah and Wh
    • 2 sets of records for running and total records
    • Readings stored in EEPROM in case of CPU reset
  • 255 step PWM controlled output
    • Adjusted up to 700 times per second
  • 3 charging modes
    • Bulk
    • Absorb
    • Float
  • Night detection to lower power consumption
    • Lower CPU frequency
    • Turns off current sensor
    • Lowers backlight brightness
  • Button for additional functions
    • Changes screens
    • Resets power flow totals
  • Over temperature cut-off
    • Protects diodes and MOSFETs from damage
    • Override available in case of temperature probe failure
  • Firmware upgradable
  • RGB status LED
    • Red = Bulk
    • Orange = Absorb
    • Green = Float
    • Blue = Night / No solar input
    • White = Power up sequence
  • Multiple screens available
    • Full information screen
    • Volts, Watts, Amps
    • Volts, Wh, Ah
    • Rotating screen
      • Volts, Watts, Amps
      • Battery %, Wh, Ah
    • Graphical screen
      • Battery bar
      • Volts
      • Battery %
      • Amps
      • Watts
      • Ah
      • Wh
    • Power
      • Hold button on this screen to reset values
    • Total Power
      • Hold button on this screen to reset values
    • Temperature override
      • Hold button on this screen to enable/disable temperature override

Gallery

Flaws in the design

As with anything I make, not everything always goes according to plan. There is one flaw with the project that I found whilst I was writing the software. The ambient temperature probe picks up heat from the voltage regulator through the copper tracks, making it slightly inaccurate (it reads high). If I had to re-make the control board I would move it further away from the regulator and put a large copper pad around it to take away any heat that is transmitted.

Challenges

There were several challenges in this version of the controller.

Initially I wanted to use N-Channel MOSFETs because they have lower resistance and are easier to drive. However I quickly found that this wouldn’t work without some complex drive circuitry. For loads N-Channel is easy, but for power shunting from a solar panel it requires complex drive circuitry in the form of a charge pump or a MOSFET driver. Needless to say I wasn’t prepared for that set back so I decided to go with P-Channel once again.

Another challenge was the software. In order to get the best possible voltage control the software has to run as quickly as possible. This means making it as efficient as possible because of the limited CPU speed. I quickly found that using timers was the best way to get around this. The main control loop runs unrestricted but non-essential code runs less frequently. The screen updates every 500ms, and everything else runs every 1 second.

Circuit Layout

I realise that many of the components are not labelled, sorry!

Code

Version_3.00 (12KB) – 04/06/2017


Older Posts »